Indian Bank Net Banking: Are you looking for a way to handle all your banking needs without stepping into a branch? Indian Bank’s net banking has got you covered! From managing your account and paying bills to transferring money and even booking tickets, everything is just a click away on your computer or mobile device.
Whether you’re new to online banking or want to make the most of what Indian Bank’s services offer, here’s everything you need to get started.
What You Can Do with Indian Bank Net Banking
Indian Bank’s net banking is like having your very own branch that’s always open. Whether you need to transfer money, check your balance, or pay a bill, these services are available to you 24/7. Let’s look at some of the top features of Indian Bank’s net banking:
1. Quick Fund Transfers
If you need to send money, whether it’s a large amount or a quick transfer to a friend, Indian Bank’s net banking has options to make it easy. You can transfer funds through NEFT (National Electronic Funds Transfer), IMPS (Immediate Payment Service), or RTGS (Real-Time Gross Settlement). Here’s a quick breakdown:
- NEFT is great for standard transfers, usually completed within a few hours during bank working hours.
- IMPS is ideal for instant transfers and is available 24/7.
- RTGS is perfect for larger amounts that need to be processed quickly, usually within the same day.
All of these can be done directly through net banking with just a few clicks, making money transfers seamless and secure.
2. Account Management at Your Fingertips
Net banking isn’t just about moving money. With Indian Bank’s services, you can keep an eye on your account 24/7. From checking your account balance to viewing recent transactions, it’s all there. You can also update personal details like your email or phone number if needed, all without stepping into a branch.
3. Open Fixed Deposits (FD) or Recurring Deposits (RD)
Fixed Deposits and Recurring Deposits are excellent ways to save, and you can open both online with Indian Bank’s net banking. Here’s why they’re useful:
- Fixed Deposits (FD) let you invest a lump sum for a set period at a fixed interest rate.
- Recurring Deposits (RD) allow you to save a small amount every month, which can be great for disciplined savings.
With net banking, you can even request an early withdrawal if you need access to funds before maturity. It’s as easy as logging in and making the request—no paperwork or hassle.
4. Bill Payments Made Simple
No more keeping track of bill due dates! With Indian Bank net banking, you can pay a variety of bills online, including:
- Credit Card Payments: Pay off your credit card bills directly through net banking.
- Utility Bills: Set up regular payments for electricity, gas, water, and other essential bills.
This means no more rushing to payment centers or worrying about late fees—just set it up, and you’re good to go.
5. Book Tickets Online
If you travel frequently, you’ll love the convenience of being able to book tickets right from your banking app. Indian Bank’s net banking allows you to book:
- Air Tickets: Ideal for quick travel bookings without visiting multiple websites.
- Rail Tickets: Reserve seats on Indian Railways trains with ease.
- Bus Tickets: For shorter trips, book a bus ticket directly through the net banking portal.
This saves time, and since it’s all in one place, you don’t need to worry about extra fees or hidden costs.
6. Track Your Chequebook Status
You can even keep tabs on your chequebook requests through Indian Bank’s net banking. Request a new chequebook, check the status of a pending request, and know exactly when it’s ready—all without needing to call or visit the bank.
How to Register for Indian Bank Net Banking
If you’re ready to enjoy the convenience of net banking, here’s a simple guide to getting started with your Indian Bank account.
- Visit the Indian Bank Net Banking Page
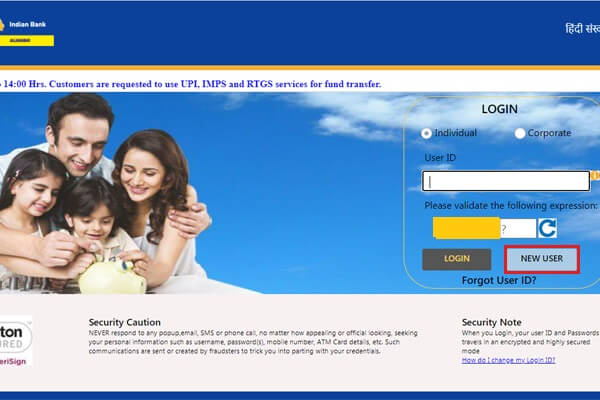
Start by heading over to Indian Bank’s official net banking page. - Click on ‘New User’
Select the ‘New User’ option under the login button. This will take you to the registration form. - Enter Your Account Information
You’ll need to input your CIF (Customer Information File) number or account number, along with your registered mobile number. - Verify with an OTP
You’ll receive a one-time password (OTP) on your registered mobile number. Enter it to proceed. - Complete Your Details and Choose Security Questions
Fill in your personal and account details as requested. Then, set up security questions to keep your account safe. - Select Activation Method
You can choose to activate your net banking account by visiting a branch or by using your ATM card. - Activate and Start Banking
Once you’ve submitted all the details, Indian Bank will activate your account within 24 hours. After that, you’re all set to start using net banking!
Logging into Your Indian Bank Net Banking Account
Once registered, logging in is simple. Here’s how to access your account, whether you’re using it for personal or corporate purposes.
For Personal Banking:
- Visit the Indian Bank Internet Banking page.
- Click ‘Login’ under Individual Banking.
- Enter your Username and Password and hit ‘Login.’
For Corporate Banking:
- Go to the Indian Bank e-banking portal.
- Under Corporate Net Banking, click ‘Login.’
- Input your Corporate User ID, Password, and Captcha, and click ‘Login.’
And that’s it—you’re now ready to use all the features Indian Bank net banking has to offer.
Forgot Your Password? Here’s How to Reset It
Forgot your net banking password? Don’t stress; here’s how to reset it quickly:
- Visit the Net Banking Page
Head over to Indian Bank’s net banking page. - Click on ‘Forgot Password’
Choose the ‘Forgot Login Password’ option, then follow the prompts to enter details like your username and account number. - Verify with OTP
You’ll get a new OTP on your registered mobile number. Enter it for verification. - Set a New Password
Follow the prompts to create a new password. Now you’re ready to log back in with your new credentials!
How to Transfer Funds Using Indian Bank Net Banking
Transferring funds is one of the biggest advantages of net banking. Here’s how to do it:
- Log In to Your Account
Enter your username and password to access your account. - Choose the “Fund Transfer” Option
Select from NEFT, IMPS, or RTGS, depending on the type and urgency of your transfer. - Add Beneficiary Details
Input details like the beneficiary’s account number, IFSC code, and transfer amount. - Confirm and Authenticate
Double-check your information, confirm the transfer, and verify it with an OTP.
Indian Bank’s Mobile Banking: On-the-Go Access
Indian Bank also offers a mobile banking app, perfect for when you’re out and about. Here’s what you can do with it:
- Check your account balance
- Book tickets for travel
- Pay bills and premiums
- Transfer funds instantly
- Request chequebooks
- View transaction history
- And much more
With the mobile app, you can handle most banking tasks on your phone, making it perfect for busy days.
The Indian Bank and Allahabad Bank Merger
Since April 1, 2020, Indian Bank has merged with Allahabad Bank, which means more branches, ATMs, and enhanced digital services. Customers from both banks can continue using mobile and net banking services without any changes. This merger has brought expanded options and a streamlined digital experience for all customers.
Also read: Axis Bank Net Banking Online Login Process
FAQs
- What is my net banking User ID?
Your User ID is the unique ID provided by the bank, typically your CIF number. - Is there a fee for net banking?
Generally, there’s no fee, but charges may apply for specific services like fund transfers. - How do I add a recipient for fund transfers?
Log in, go to the ‘Fund Transfer’ section, and add beneficiary details. - Can I access multiple accounts with one User ID?
Yes, if they’re linked to the same User ID, you can manage multiple accounts easily. -
How do I check my account statement online?
Simply log in and select ‘Account Statement’ from the options to view or download your statement.


